Showing posts with label HTML5 TUTORIALS. Show all posts

Saturday, 23 December 2017

How to use Modernizr JavaScript library in HTML5

That Modernizr helps to detect whether the browser supports CSS3 or HTML5 features. Now here we create a Web page named modernizruse.html to see how to use Modernizer JavaScript library.

//// modernizruse.html file////

<!doctype html>
<html>
<head>
<meta charset="utf-8">
<title>Use of the Modernizr in HTML5</title>
<SCRIPT src="modernizr-1.6.min.js"></SCRIPT>
</head>
<body>
<div id="music">
<AUDIO>
<SOURCE src="audio.mp3">
</AUDIO>
<BUTTON id="play">Play</BUTTON>
<BUTTON id="pause">Pause</BUTTON>
</div>
<SCRIPT>
if(Modernizr.audio){
alert("Your Browser supports audio.");
}else{
alert("Your Browser does not support audio.");
}
</SCRIPT>
</body>
</html>
A Web page is created to use the AUDIO element of HTML5. The reference of Modernizr JavaScript library is provided in the SCRIPT element of the HEAD element. Then a condition is applied to check whether or not the AUDIO element is supported by the browser.
When you open the modernizruse.html file in the Google Chrome browser then it show an alert message box for supporting AUDIO element.

Friday, 22 December 2017

Create 2D Graphics in HTML5

The SVG element is used to create 2D Graphics in HTML5. Now we create a Web page named 2dgraphicsusingsvgelement.html to see how to create 2G graphics using the SVG element.

////2dgraphicsusingsvgelement.html ////

<!doctype html>
<head>
<title>2D Graphics using SVG element </title>
</head>
<body>
<h1> 2D Graphics using SVG element in HTML5 </h1>
<SVG id="svgelem" xmlns="http://www.w3.org/2000/svg">
<CIRCLE id="redcircle" cx="50" cy="50" r="50" fill="red">
<LINE x1="200" y1="10" x2="200" y2= "100"
style="stroke:purple;stroke-width:4">
<POLYGON points=" 50, 100,30,20,170,50" fill="lime">
<DEFS>
<RADIALGRADIENT id="gradient" cx="50%" cy="50%" r="50%" fx="50%" fy="50%">
<STOP offset="0%" style="stop-color:rgb(100,250,150);
stop-opacity:0">
<STOP offset="100%" style="stop-color:rgb(0,100,255);
stop-opacity:1">
</RADIALGRADIENT>
</DEFS>
<ELLIPSE cx="500" cy="50" rx="100" ry="50"
style="fill:url(#gradient)">
<RECT x="50" y="50" width="250" height="250"
style="fill:blue;stroke:pink;stroke-width:5;
fill-opacity:0.1;stroke-opacity:0.9;padding:10,50;">
</SVG>
</html>

The SVG element is used to create 2D images in the Web page. Different elements used to display different shapes such as CIRCLE, LINE, and POLYGON. An ellipse shape is also drawn with radial color effects.

Desktop Notifications Feature in HTML5

HTML5 provides desktop notifications feature that allows websites to send notifications to your desktop. In this section we learn to create a Web page named desktopnotification.html
That sends desktop notification. Here we need to run this Web page from Internet Information Services (IIS) Server.  We need to copy the desktopnotification.html file in the inetput/wwwroot folder.

////desktopnotification.html ////
<!doctype html>
<head>
<title>Desktop Notification in HTML5 </title>
<SCRIPT>
function RequestPermission (callback) {
window.webkitNotifications.requestPermission(callback);
}
function add() {
if(window.webkitNotifications.checkPermission()>0){
RequestPermission(add);
}
else{
var num1=perseInt(document.getElementById('num1').value);
var num2=perseInt(document.getElementById('num2').value); 
var num3=num1+num2;
window.webkitNotifications.createNotification("","Sum of "+num1+"  and "+num2+" is", num3). show() ;


</SCRIPT>
</head>
<body>
<h1> Here we create notification example of HTML5 </h1>
number 1:<input type="text" id="num1" value=""><br>
number 2:<input type="text" id="num2" value=""><br>
<button onclick="add() ">add</button>
</body>
</html>


Here we have created a form to accept two numbers and display the addition of numbers in a desktop notification message box. When you enter numbers in the provided fields and click the add button the add() method is called. The add() method checks whether or not your desktop provides the required permission to the Web page to send notification by using the checkPermission() method. If permission is not given it  calls the requestPermission() method to take permission and calls the add() method again Now the add() method uses the createNotification() method to display the sum of the numbers that are entered by you in the provided field. 

"To display the Output of the desktopnotification.html file enter the http://localhost/desktopnotification.html URL in your browser and press the ENTER Key. " 

Saturday, 2 December 2017

Implementing Web Worker in HTML5

That Web Workers are scripts that work in background and do not interrupt user interface scripts. Now create a Web page named webworkerspage.html that uses a worker script file, named worker.js show how to use Web Workers in a Web page.

////Create a Web page named webworkerspage.html///

<!doctype html>
<head>
<title>Web Workers Example</title>
</head>
<body style="background-color:gold;">
<h3>The highest prime number discoverd so far is :<OUTPUT id="result"></OUTPUT></h3>
<script>
var worker=new Worker('worker.js');
worker.onmessage=function(event){
document.getElementById('result').textContent=event.data;
};
</script>
</body>
</html>

////Create worker.jd file////

var n=1
search:white(true)
{
n+=1;
for(var i=2;i<=math.sqrt(n);i+=1)
if(n%1==0)
continue search;
//found a prime!
postMessage(n);
}

Here: A web page created to display the highest prime number. This prime number is calculated with the helps of a web worker script file, worker.js. The Worker() constructor creates a worker instance to communicate with the worker. The onmessage event handler allows the code to receive message from the worker. In worker.js a script code is searching a prime number and sends a message back to The Web page. This script uses the postMessage() method to post a message when a prime number is found.

Wednesday, 22 November 2017

Implementing Database Storage in HTML5

HTML5 enables you to store data in database on a client's machine using a real SQL database. Now create a Web page named databasestorage.html to implement database storage.

//// implement the databasestorgae on a system////
<!doctype html>
<head>
<title>Database storage Example</title>
<style>
#websqldb-example.record-list li:nth-child(odd){background-color:lightgreen;
}
#websqldb-example.record-list li:nth-child(even){background-color:pink;}
#websqldb-example.record-list li{
padding-left:5px;
}
#db-results{
max-height:150px;
overflow:auto;
text-align:left;
}
#websqldb-example.error{
color:red;
}
</style>
</head>
<body>
<div class="slide" id="web-sql-db">
<header><h1>Web SQL Database</h1></header>
<section>
<div class="center" id="websqldb-example">
<button onclick="webSqlSample.createTable()">create table</button><br>
<input typle="text" id="todoitem">
<button onclick="webSqlSample.newRecord()">Add new item to the table</button><br>
<button onclick="webSqlSample.dropTable()">Drop table </button>
<p>The generated database is given as follows:</p>
<ul class="record-list" id="db-results"></ul>
<div id="db-log"></div>
</div>
<script defer>
var webSqlSample=(function(){
var db;
var log=dacument.getElementById('db-log');
if(window.openDatabase){
db=openDatabase("DBTest","1.0","HTML5 Database API example",200000);
showrecords();
}
document.getElementById('db-results').addEventListener('click',function(e){e.preventDefault();},false);
function onError(tx, error){
log.innerHTML='<p class="error">Error:'+error.message+'</p>';
}
function showRecords(){
document.getElementById(''db-results).innerHTML='';
db.transaction(function(tx){
tx.executeSql("SELECT*FROM Test",[],function(tx,results){
for(var i=0,item=null;i<result.rows.length;i++){
item=result.rows.item(i);
document.getElementById('db-results').innerHTML+=
'<li><span contentEditable="true"
onkeyup="webSqlSample.updateRecord('+item['id']+',this)">'+item['text']+'</span><a href="#" onclick="webSqlSample.deletRecord('+item['id']+')">[Delete]</a></li>';
}
});
});
}
function createTable(){
db.transaction(function(tx){
tx.executeSql("CREATE TABLE Test(id REAL UNIQUE,text TEXT)",[],
function(tx){log.innerHTML='<p>"Test"table created!</p>'},onError);
});
}
function newRecord(){
var num=Math.round(Math.random()*10000);//random data
db.transaction(function(tx){
tx.executeSql("INPUT INTO Test(id,text) VALUES(?,?)",[num,document.querySelector('#todoitem').value],
function(tx,result){
log.innerHTML='';
showRecords();
},
onError);
});
}
function updateRecord(id,textEl){
db.transaction(function(tx){
tx.executeSql(UPDATE Test SET text=? WHERE id=?",
[textEl.innerHTML,id],null,onError);
});
}
function deleteRecord(id){
db.transaction(function(tx){
tx.executeSql("DELETE FROM Test WHERE id=?",[id],
function(tx,result){showRecords()},
onError);
});

function dropTable(){
db.transaction(function(tx){
tx.executeSql("DROP TABLE Test",[],
function(tx){
showRecords();
log.innerHTML='<p>Table deleted! </p>'},
onError);
});
}
return{
newRecord:newRecord,
createTable:createTable,
updateRecord:updateRecord,
deleteRecord:deleteRecord,
dropTable:dropTable
}
})();
</script>
</section>
</div>
</body>
</html>

The createTable(), newRecord(), deleteRecord(), updateRecord(), showRecords(),
and dropTable() functions are created using JaveScript. These functions are using the transaction() and executeSql() function to insert and access the data stored in a database.

Tuesday, 21 November 2017

Working With Local Storage In HTML5

The local storage is same as the session storage except for the feature of persistency. In other words local storage stores the saved data on user's computer even after closing the browser window. Now create a Web page named localstorageexample.html to show how to implement local storage.

//////////localStorageexample.html file///////////////
<!doctype html>
<head>
<title>Working with session Storage example</title>
<style type="text/css">
#todolist{
width:350px;
height:200px;
font:normal 14px Arial;
background:lightyellow;
border:5px groove gray;
overflow-y:scroll;
padding:4px;
}
#todolist ol{
margin-left:-15px;
}
#todolist li
{
border-bottom:1px solid gray;
margin-bottom:8px;
}
</style>
</head>
<body>
<div id="todolist" contentEditable="true">
<div contentEditable="false"><b>Enter Your tasks in the following TO DO LIST:</b></div>
<ol>
<li>Take breakfast in PQR hotel</li>
<li>Meeting with Aggrawal And Group Company Manager</li>
<li>Set alarm to 5:30 am</li>
</ol>
</div>
<input type="submit" value="Reset TO DO LIST" onClick="resetlist();return false">
<script type="text/javascript">
var defaulthtml='<div contentEditable="false"><b>Enter your tasks in the following TO DO LIST:</b></div>\n'
defaulthtml+='<ol>\n'
defaulthtml+='<li>Take breakfast in PQR hotel</li>\n'
defaulthtml+='<li>Meeting with Aggrawal and group company manager</li>\n'
defaulthtml+='<li>Set alarm to 5:30am </li>\n'
defaulthtml+='</ol>'
function resetlist(){
todolistref.innerHTML=defaulthtml
domstorage.todolistdata=defaulthtml
}
var todolistref=document.getElementById("todolist")
var domstorage=windo.localStorage||(window.globalStorage?
globalStorage[location.hostname]:null)
if(domstorage){
if(domstorage.todolistdata){
todolistref.innerHTML=domstorage.todolistdata
}
todolistref.onkeyup=function(e){
domstorage.todolistdata=this.innerHTML
}
}
</script>
</html>

A to do list area is created in which we can list the daily routine tasks. The localStorage object is used to store details that you enter in the list. However the list is maintained till your browser window is closed and reopened.

The OUTPUT of the above Web page is:


Monday, 20 November 2017

Working With Session Storage in HTML5

The sessionStorage object is used to store data till duration of the browser session. Now create a web page named sessionStorage.html to implement session storage.

//////////sessionStorage.html file///////////////
<!doctype html>
<head>
<title>Working with session Storage example</title>
<style type="text/css">
#todolist{
width:350px;
height:200px;
font:normal 14px Arial;
background:lightyellow;
border:5px groove gray;
overflow-y:scroll;
padding:4px;
}
#todolist ol{
margin-left:-15px;
}
#todolist li
{
border-bottom:1px solid gray;
margin-bottom:8px;
}
</style>
</head>
<body>
<div id="todolist" contentEditable="true">
<div contentEditable="false"><b>Enter Your tasks in the following TO DO LIST:</b></div>
<ol>
<li>Take breakfast in PQR hotel</li>
<li>Meeting with Aggrawal And Group Company Manager</li>
<li>Set alarm to 5:30 am</li>
</ol>
</div>
<input type="submit" value="Reset TO DO LIST" onClick="resetlist();return false">
<script type="text/javascript">
var defaulthtml='<div contentEditable="false"><b>Enter your tasks in the following TO DO LIST:</b></div>\n'
defaulthtml+='<ol>\n'
defaulthtml+='<li>Take breakfast in PQR hotel</li>\n'
defaulthtml+='<li>Meeting with Aggrawal and group company manager</li>\n'
defaulthtml+='<li>Set alarm to 5:30am </li>\n'
defaulthtml+='</ol>'
function resetlist(){
todolistref.innerHTML=defaulthtml
domstorage.todolistdata=defaulthtml
}
var todolistref=document.getElementById("todolist")
var domstorage=(window.sessionStorage)? sessionStorage[location.hostname]:null
if(domstorage){
if(domstorage.todolistdata){
todolistref.innerHTML=domstorage.todolistdata
}
todolistref.onkeyup=function(e)
{
domstorage.todolistdata=this.innerHTML
}
}
</script>
</html>

A to do list area is created in which we can list the daily routine tasks. the sessionStorage object is used to store the details that we enter in the list.
Note: that the list is maintained till your browser window remains opened.

The OUTPUT of the Above Web Page is:

Enter a few entries in TO DO LIST as shown below :--


Friday, 17 November 2017

Working with Custom Data Attributes in HTML5

These custom Data Attributes are prefixed with the data-text such data-xxx and data-xxx. Here we create a Web page named customDataattribute.html which shows how to use custom data attributes.

<!doctype html>
<head>
<title>this example of the custom Data attribute </title>
</head>
<body>
<img src="car2.jpg" data-out="car1.jpg" data-over="car3.jpg">
<SCRIPT type="text/javascript">
function imagerollover() {
var allimages=document.getElementsByTagName("img")
var preloadimages=[]
for (var i=0;i<allimages.length;i++){
if(allimages[i].getAttribute("data-over"))
{
preloadimages.push(new Image())
preloadimages[preloadimages.length-1].src=allimages[i].getAttribute

("data-over")
allimages[i].onmouseover=function(){
this.src=this.getAttribute("data-over")
}
allimages[i].onmouseout=function() {
this.src=this.getAttribute("data-out")
}
}
}
}
imagerollover()
</SCRIPT>
</body>
</html>

In this Web page,  three images are shown by using the IMG element. Two custom data attributes data-out and data-over, are created with the IMG element to specify the source of other images. 


When you keep mouse over any image the image is changed into another image. This is because the data-over attribute is modifying one image with another image.


Working with the spell check Attribute in HTML5

The spellcheck attribute is used to check spelling mistakes of the Web content. Now here we create a Web page named spellcheck-attribute-in-html5.html.html to show the use of the spellcheck attribute.

<!doctype html>
<head>
<title> here we show the example of spellcheck </title>
</head>
<body>
<form>
<TEXTAREA style="width :300PX;height:150px;border:1em solid black" spellcheck ="false" contentEditable ="true"> Spell check off</TEXTAREA ><BR>
<TEXTAREA style="width :300PX;height:150px;border:1em solid black" spellcheck ="true" contentEditable ="false"> Spell check on</TEXTAREA ><BR>
</form>
</body>
</html>

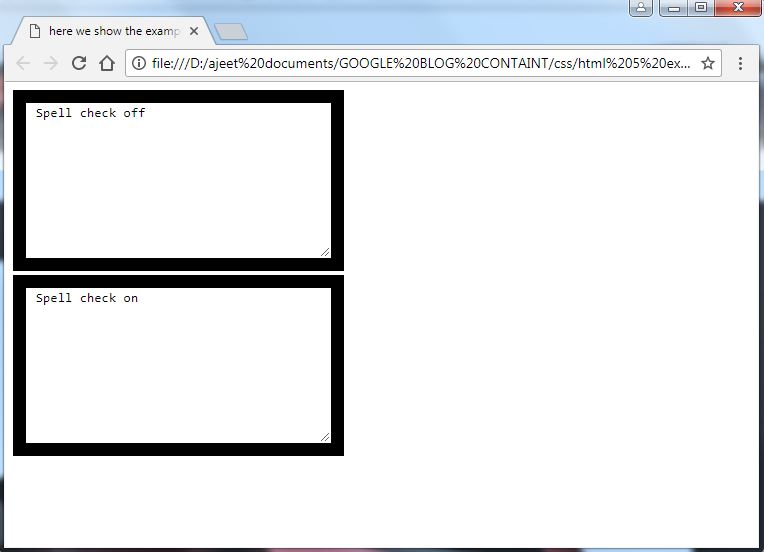
In this Web page a form is created with two text areas. In the first text area, spellcheck is turned off, while in the second text area spellcheck is turned on. 
The Output of the above Web page is:

We see two text areas. Enter the text in these text areas to check the spelling mistakes.


Tuesday, 14 November 2017

Working With The contentEditable Attribute In HTML5

The contentEditable attributes is used to make the text of an element as editable. Now create a Web page named contentEditableattribute.html which shows the use of the contentEditable attribute.

// Web page name is contentEditableattribute.html
<!doctype html>
<head>
<title>HTML 5 contentEditable Example </title>
<SCRIPT>
function getUserScribble()
{
var scribble='<i style="color:magenta;font-family:Geneva, Arial;font-size:5;">Write here.....</i>';
document.getElementById('scribble').innerHTML=scribble;
}
</SCRIPT>
</head>
<body onload="getUserScribble()">
<p>
<table width=320 height=450 border=0 cellspacing=0 cellpadding=62>
<td background="nature1.jpg" contentEditable="true" id="scribble"></td>
</table>
<SCRIPT>getUserScribble();
</SCRIPT>
<p>
</body>
</html>

Here :- An image is loaded which provides a text area for editable text. The editable text is created by setting the value of the contentEditable attribute to true.

The output of Above Web page is:


Above output shows a picture that provides you with an area to write your message.

Exploring Offline Web Applications Using manifest attribute In HTML5

An offline Web application is an application that can work without a network connection. It allows the application cache to store resources that are used by the browser when it is offline. The application cache is controlled by a plain text file which is called manifest. A manifest file contains a list of resources to be used when there is no network connectivity. An Example of a manifest file is given as follows:

CACHE MANIFEST         #This is a
commentCACHE:/css/screen.css/css/offline.css/js/screen.js/img/logo.pnghttp://example.com/css/styles.cssFALLBACK:/ /offline.htmlNETWOK:*An example
application cache manifest file    

In the preceding example the first line CACHE MANIFEST tells the browser that this is a manifest file and the comments are prefixed by a hash(#).
A manifest file contains the following sections:

  • CACHE:- Specifies a list of files and resources that the browser needs to store or cache.
  • FALLBACK:- Specifies a list of files that are required to be mapped with an application when the browser has no online access.
  • NETWORK:- Specifies the resource that are available online.
We can provide the reference of a manifest file on a Webpage by adding the manifest attributes in the <HTML> tag 

like:
<!doctype html>
<html lang="en" manifest="/offline.manifest">
....
...
</html>
In this code the manifest attribute is used in the <HTML>tag to provide the reference of a manifest file, offline.manifest.


Monday, 13 November 2017

Exploring ARIA Accessibility in HTML5

Web Accessibility Initiative Accessible Rich Internet Applications (WAI-ARIA) is a technical specification, which is published by World Wide Web Consortium (W3C). It contains a set of guidelines to create web applications for disabled users. Such users are unable to access mouse-based Internet applications, and require assistive technologies, for instance screen readers to interact with customized controls, such as checkbox and context-menu. Nowadays, web developers use client side scripts, for instance JavaScript, to create customized controls that are often not accessible to users with disabilities. The WAI-ARIA specification addresses these accessibility challenges by adding aria-* attributes, which enable the users with disabilities to access customized controls.

ARIA Attribute
HTML attribute
HTML element
aria-autocomplete
autocomplete
FORM and INPUT
aria-checked
checked
COMMAND and INPUT
aria-disabled
disabled
BUTTON, COMMAND, FIELDSET, INPUT, KEYGEN, OPTGROUP, OPTION, SELECT and TEXTAREA
aria-expanded
open
DETAILS
aria-haspopup
contextmenu
All elements
aria-grabbed
draggable
All elements
aria-hidden
hidden
All elements
aria-multiselectable
multiple
INPUT and SELECT
aria-readonly
readonly
INPUT and TEXTAREA
aria-required
required
INPUT, SELECT and TEXTAREA
aria-valuemax
max
PROGRESS and INPUT
aria-valuemin
min
INPUT
aria-valuenow
value
PROGRESS and INPUT

Wednesday, 8 November 2017

The draggable and dropzone Attributes in HTML5

We can make a draggable HTML element by using the draggable attribute.

The syntax:

element.draggable[=value]

In the preceding Syntax the value can be true, false or auto. The true value indicates that the  element is draggable, the false value indicates that the element is not draggable  and the auto value specifies the default behavior of the element.

<body>
<p draggable="true"> You can drag this paragraph. </p>
<p draggable="false">You cannot drag this paragraph</p>
</body>

The HTML element may specify the dropzone attribute to drop the data. the attribute is specified by using any one of the following values.

  • copy:- Creates a copy of the draggable data from source location to a target location.
  • move
  • link

The DragEvent and DataTransfer Interface in HTML5

DragEvent interface is used to create objects of the DataTransfer interface and initialize the dragging operation. It provides the dataTransfer attribute and initDragEvent() method for this purpose. The dataTransfer attribute of the DragEvent interface returns an object of the DataTransfer interface. The initDragEvent() method initializes an event to drag the data. The DataTransfer interface provides various attributes and methods.

  • dataTransfer.dropEffect[=value] :- Specifies an attribute to set an operation when the data is dropped. the possible values are none, copy, link, and move.
  • dataTransfer.effectAllowed[=value]:- Specifies an attribute to set the kinds of operations that are to be allowed. The possible values are none, copy, copyLink, copyMove, linkMove, move all, and uninitialized.
  • dataTransfer.items :- Specifies an attribute that returns the drag data with a DatatransferItems object.
  • dataTransfer.setDragImage(element, x, y):- Specifies an method that sets a dragged image to a specified element and replaces the dragged purpose.
  • dataTransfer.addElement(element):-Specifies a method that adds an element to the list of elements used for the dragging purpose.
  • dataTransfer.types:- Specifies an attribute that returns a list of formats that are set to specify the types of dragged data.
  • data=dataTranfer.getData(format):- Specifies a method that returns the specified data.
  • dataTransfer.setData(format,data):-Specifies a method That sets the specified data.
  • dataTransfer.clearData([format]):-Specifies a method that removes data of the specified formats.
  • dataTransfer.files:- Specifies an attribute that return list of all the files that are being dragged.

Sunday, 5 November 2017

Drag and Drop Events in HTML5

The drag and drop feature allows you to drag a textual data or an image from the source area to target on a Web page where source and target area can be two containers or text areas.

dragstart :- fires when you start dragging an object

drag :- fires every time when the mouse is moved to drag an object

dragenter :- fires when a draggable object is dragged inside an object

dragover :- fires every time a draggable object is moved inside an object

dragleave :- fires when a draggable object is dragged out from an object

drop:- fires when a draggable object is dropped into an object

dragend :- fires when you release the mouse button while dragging an object

Client - side Storage in HTML5

Sometimes we need to store data accessed from the Internet to your local system. The most common method to store data locally in all browsers is cookies which are key-value pairs of strings that are stored locally in a text file. These text files are sent to the server having the some domain name with respect to every hyper text transfer protocol (HTTP) respect. HTML5 provides a new feature that supports the client - side Storage which is further divided into the following types of storage.

  1. Session storage :- session storage is a storage that acts as cookies but has more storage capacity. A cookies has the capacity to store a maximum of 4 kilobytes (KB) data. However a session storage has the capacity to store data in mega bytes (MB). 
For Example :-
sessionStorage.setItem('fullname', a kumar ') ;
alert("Your name is:"+sessionStorage.getItem('fullname'));
alert ("Hello "+sessionStorage.fullname);
sessionStorage.removeItem('fullname');

2.Local storage:- Local storage is same as the session storage except the feature of persistency. In other words a localStorage object can be assured as a persistent version of a sessionStorage object.

For example:-
sessionStorage.setItem('fullname', a kumar ') ;
alert("Your name is:"+sessionStorage.getItem('fullname'));
alert ("Hello "+sessionStorage.fullname);
sessionStorage.removeItem('fullname');

3.Database storage :- HTML5 also provides database storage to store data on a clients machine using a Structured Query language (SQL) database. It uses a temporary database to store data for a specified period of time. 

db=openDatabase("DBTest", 1.0,"HTML5 Database API  example ", 200000);

Thursday, 2 November 2017

Microdata Features of HTML 5

Microdata is one of the new features of HTML5 that is used to embed semantic markup into HTML
documents. Semantic markup is the machine-readable code that includes logic, information, outline data or message content and is used with HTML tags to categorize the HTML page content by search engine. Microdata allows you to annotate content with specific machine-readable. Microdata is the data that is created in the form of customized properties with name-value pairs to define a vocabulary describing a business listing. It consists of groups of name-value pair where each name-value pair is a property and the groups of such name-value pair are called as items. These items and properties are represented by regular HTML elements. Each item can have an item type a global identifier supported by its item type and a list of name-value pairs. A property is a name-value pair that consists of a property name and one or more property values.
The Microdata feature has introduced the following global attribute for HTML elements.

  • itemscope Attribute:-Specifies a boolean attribute to create a new item or group og name-value pairs.
For Example:
<DIV itemscope>
..........
........
</DIV>
  • itemprop Attribute:- Specifies a property to one or more items.
For Example:
<DIV itemscope>
<P>Name of Customer is<SPAN itemprop="custname">akumar</SPAN></P>
<P>country is<SPAN itemprop="cuscountry">India</SPAN></P>
<p>Customer Phone is<SPAN itemprop="custph">9876534353</SPAN></p>
</DIV>
  • itemref:-Specifies a list of additional elements to find the name-value pairs of an item
For Example:
<DIV itemscope id="akumar" itemref="a b"></DIV>
<p id="a">Name:<SPAN itemprop="name">Akumar</SPAN></p>
<p id="b" itemprop="team" itemscope itemref="c"></DIV>
<DIV id="c">
<p>Team:<SPAN itemprop="name">Cricket</SPAN></p>
<p>Players:<SPAN itemprop="size">12</SPAN>Players</p>
</DIV>
  • itemtype:- Specifies the type of an item
For Example:
<SELECTION itemscope itemtype="http://careersoft-tech.blogspot.com#HTML5 tutorial">
<h1 itemprop="name">CO CO cola</h1>
<p itemprop="desc">co co cola is the cool drink</p> 
<img itemprop="img" src="cococola.jpg" alt="" title="cococola, age 7 months">
</SELECTION>
  • itemid:- Specifies a global identifier for an item
For Example:
<DL itemscope itemtype="http://vocab.example.com/book" itemid="urn:isbn:0-111-11111-1">
<DT>Title
<DD itemprop="title">An Inalienable Right to life

<DT>Author  
<DD itemprop="author">Kumar lamba
</DL>

Wednesday, 1 November 2017

Custom Data Attributes in HTML5

Custom Data Attribute is the new features of HTML5 is the addition of custom Data Attributes. A custom Data attribute is used to store private data which is not seen by end users of the application. A custom Data attribute consists of the below two parts:


  1. Attribute name- Specifies a name that must be prefixed with data- and does not contain any uppercase letters. 
  2. Attribute value- Specifies a value in string format. 
FOR EXAMPLE :

<LI class="user" data-name="AjuSingh" data-city ="delhi" data-lang="js" data-food="pizza">
<B>Akumar says:</B>
<SPAN>Hello dear, how are you? </SPAN>
</LI>


Here data-name, data-city, data-lang, and data-food are examples of the custom attributes. 

spellcheck attribute in HTML5

The spell check feature is introduced in HTML5 to allow we to check spelling mistakes of the editable text. This feature uses the contentEditable Attribute to find spelling mistakes in Web page.

Syntax :

<element spellcheck=[value] >

Here the element represents an HTML element and the spellcheck attribute can take any of following values:


  • True -  Checks an element for spelling and grammar if it's content is editable 
  • False -  Does not check an element for spelling and grammar 
  • Inherit -  Specifies that an element inherits the sell check behavior from its parent element 


The below code we use the spellcheck attribute :

<TEXTAREA spellcheck="true">
.........
........
........
<TEXTAREA>

contentEditable Attribute in HTML5

Editable content means the content that can be edited after being loaded on the Web browser. We can make content of an HTML element as editable by using the contentEditable Attribute. The syntax to use the contentEditable Attribute  is given as follows.

Syntax :
<element contentEditable=[value] >

Here element refers to an HTML element and the contentEditable Attribute can take any of the following values:

  • True - Indicates that element is editable 
  • False- Indicates that the element is not editable 
  • inherit - Indicates that the element is also editable if it's parent is editable 
We can confirm whether an element is editable or not by using the isContentEditable attribute which returns true if the element is editable and the false if it is not.

Syntax :
element.isContentEsitable

Here the element returns true if it is editable otherwise returns false.